Effects
nuit’s effects system is one of the things that most sets it apart from other SL clubs. There’s a lot to it. This page will include some high level description of how it works. There will be separate pages going into detail on specific commands.
The Effects Desk
You might have seen this desk on the lower stage at the front of the club.
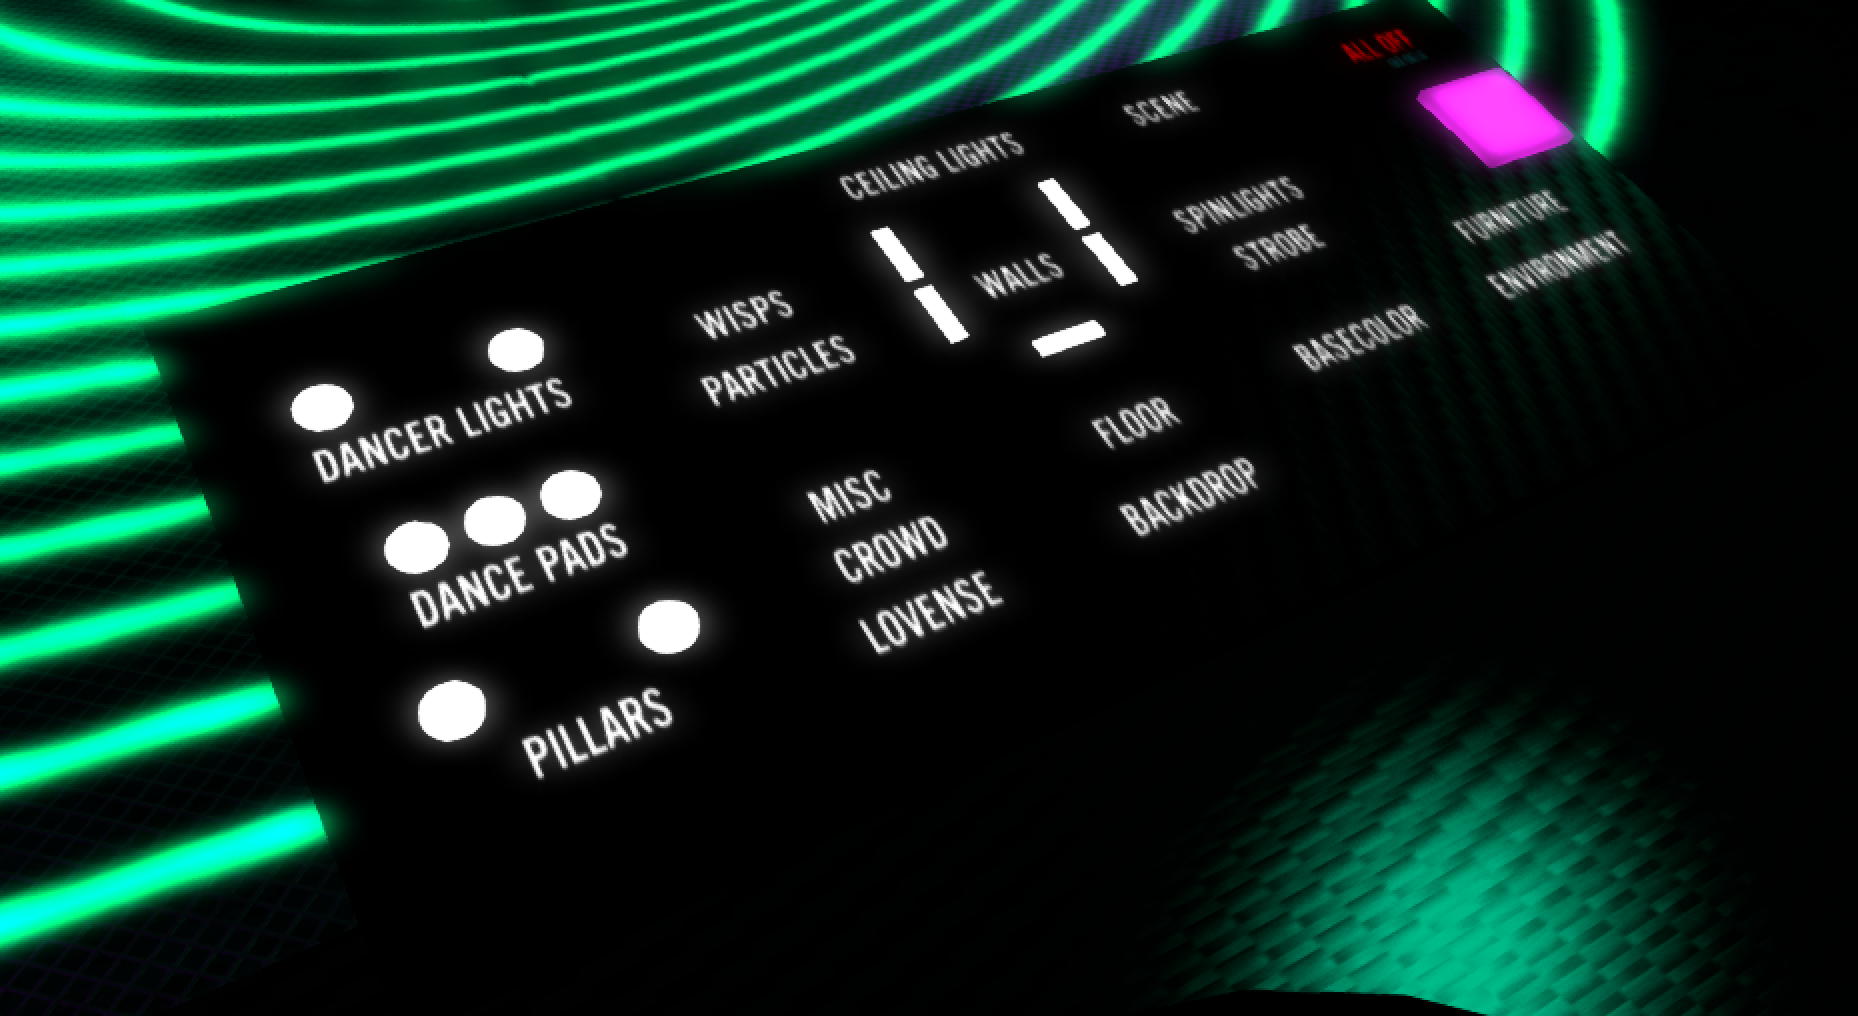
Every word and shape is a clickable button. Anyone within 2m of the desk can click those things and control the club effects. There is no group membership or access list required.
When there’s no show going on, feel free to come by the club and try out the desk to see what all the buttons do. You don’t need to ask permission. If there’s someone already using the desk, just ask when they’ll be done and you can come back.
Words vs Shapes
Some of the functions on the desk have some circular or rectangular buttons to help control them. These correspond to physical locations in the club. For example, there are two “Pillars” effects on either side of the stage. If you want to control just the right one or just the left one, then click the circle to the right or left of the word “Pillars”. If you want to control both at once, then click the actual word “Pillars”.
Learn by Doing
Since you can figure out what a button does by clicking it, I’m not going to document them all here.
Commands
The buttons in the desk are a convenience layer for driving the underlying effects system, which is based on chat commands on a hidden channel. Each button really just outputs one or more commands. To learn the commands, ask Nirea for a copy of the “nuit command relay HUD”. When you attach that, you’ll see it appear as an orange square at the top center of your viewer.
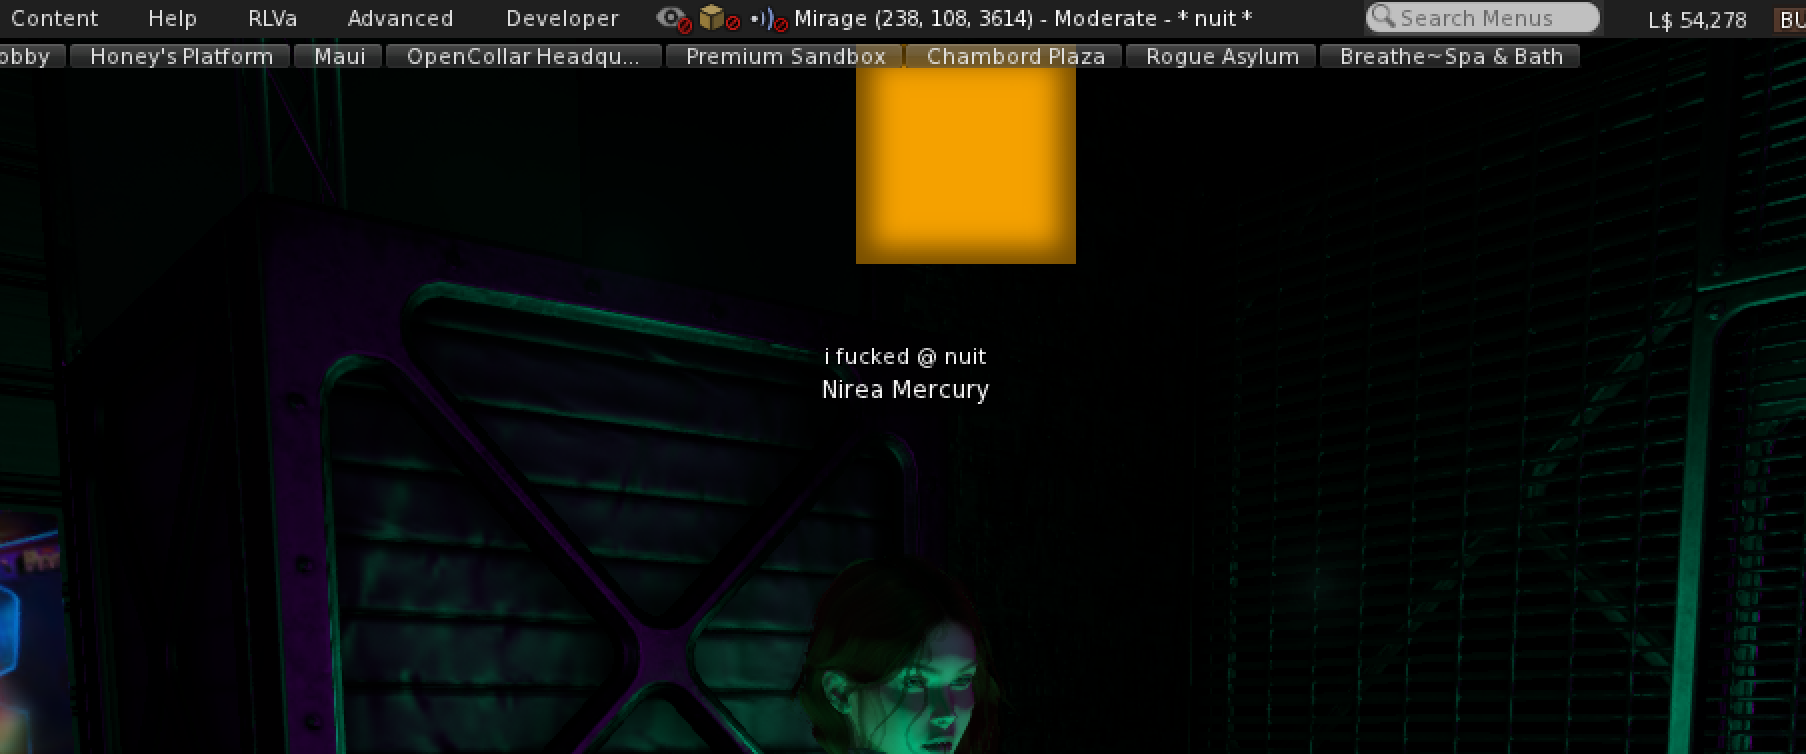
You don’t need to click anything on that HUD. Its only purpose is to listen in on the hidden effects channel and forward all the commands to you as they come through. While wearing the HUD, try clicking on different buttons on the desk. You’ll see commands appear in your chat history.
Sending Commands
Way over on the right side of the desk, you’ll notice a pink square. That is different from all the other buttons on the desk. When you click it, you’ll get a text box dialog where you can paste one or more commands, that will then be sent to the various effects objects in the club. Try pasting some commands in there and clicking Submit. You should see those effects respond just like they do when you click buttons.
This is how effects people typically work. They’ll use the desk to try out ideas, with the command relay HUD attached. When they find something they like, they’ll paste the commands for it into a notecard so they can remember them later.
Not only does this command system make it easier to reproduce a certain look, it is sometimes the only reliable way to change effects during a show. When the club has 90 people in it, the menus in the desk are too lagged to be reliable. Pasting commands into the dialog will still work though.
Command Dialog Limit
The command dialog uses the llTextBox function in LSL, which is limited to 250 characters. If you try to past more characters than that, your text will be truncated, which will probably result in the last command being invalid.
In practice, you can usually only paste 3-4 lines or so at a time.
Customizing
When you look at the commands, you’ll notice some common patterns. Sometimes you’ll see “vectors” that look like this:
<0.00000, 1.00000, 1.00000>
And sometimes you’ll see UUIDs that look like this:
c2edb314-0519-ba59-a8a5-b255a855db27
Other times you’ll see a number that looks like a BPM, like 90 or 120.
When you see a vector, it’s usually a color. When you see a UUID, it’s usually a texture. When you see a number, it’s usually a control for speed or brightness. You should experiment with changing those values to see what changes in the club. By customizing the values in a command, you can set your own colors, textures, or other parameters that aren’t available when just clicking buttons in the desk.
A Note On LSL Colors
You’ve probably heard of “RGB” colors, meaning a color broken into red, green, and blue values that range from 0 to 255. An LSL color vector like the one above is mostly the same. The first number in the vector represents red, the second is green, and the third one is blue. But unlike typical RGB colors, LSL color values range from 0 to 1 instead of 0 to 255. It’s mathematically simple to convert between the two, but can be hard to divide things by 255 in your head.
Thankfully, you don’t have to. The in-world color picker lets you see the LSL color values for any color you pick. If you select “LSL” in the format selector in the top left, then you can just copy/paste the values straight into your nuit effects commands. Here’s a screenshot:
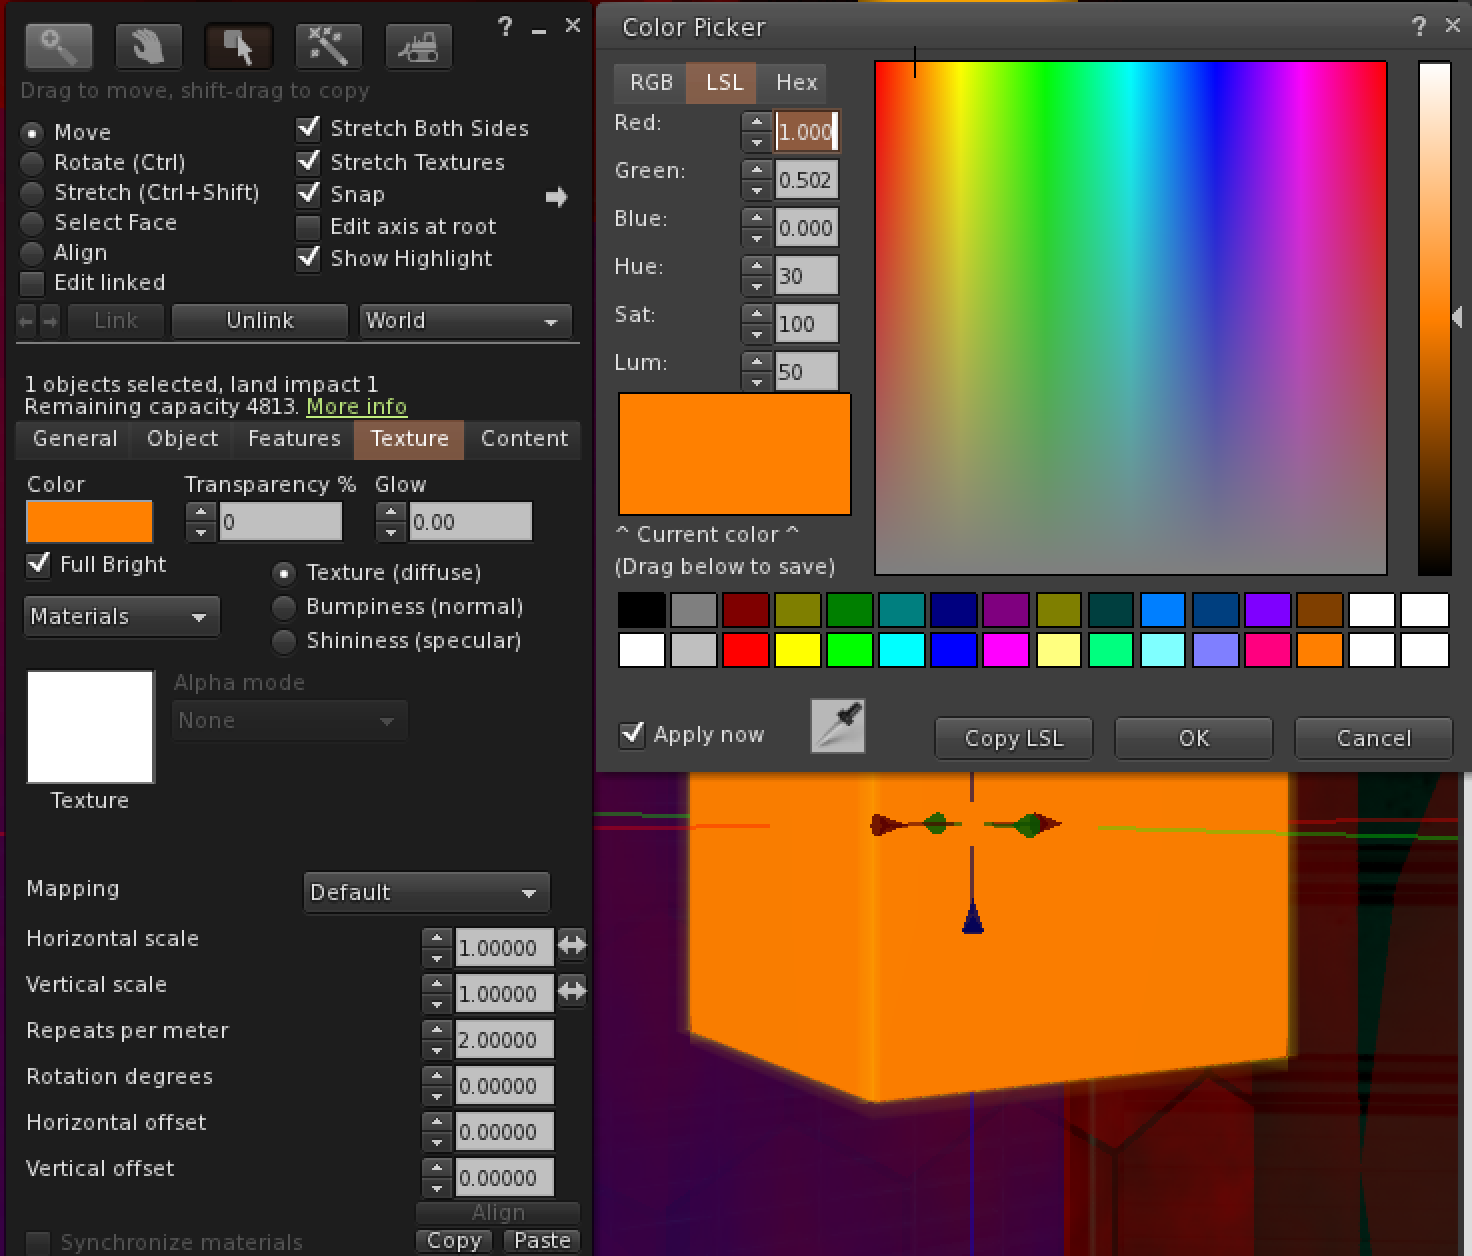
You can see in that example that the LSL format is selected in the top left, and the red, green, blue values are 1, .502, and 0. So you could make that an LSL color vector by adding angle brackets, which would give you <1, 0.502, 0>.
Texture Preloading
If you use custom textures in your effects for particles or putting on the walls, your audience’s SL viewers will have to download those textures when you send those commands. When the club is full of people and lagging, it can take a while for those textures to load, which results in people just seeing a gray square instead of the awesome texture you uploaded.
The standard trick to prevent this is to force their viewers to “preload” the textures by applying them to one or more prims that are rezzed inworld, before you need them. Then your textures will be in the audience’s viewer cache when you send your command, and your texture will appear immediately.
Ask Nirea or another member of staff for the “nuit Texture Preloader”. To use it, do the following:
- Rez the preloader in the club. Somewhere up on stage is ideal, but don’t block the tip jars.
- Drag the notecard for your show effects into the preloader object’s inventory.
- Make the preloader invisible by setting its transparency to 100%.
The script inside the preloader will read your notecard, extract any UUIDs in your commands, and set them as textures on all its faces (one texture per face). It has 72 faces total, so can preload up to 72 textures. If you need more, you’ll need to rez another preloader and give it another notecard with the rest of your textures in it.
Command Reference
This section lists (or eventually will list) every command supported by the nuit effects system.